
Aspire Thinking has been rebranded to Intuitive Minds - Same people, same quality service with more locations

O level Physics Notes
Essentials Guide
Contact Us for Trial Class and Timings
Welcome to our O levels Physics Notes: Crafted to unravel the difficulty of O Level Physics, breaking down each topic into easily digestible segments. Whether you're a beginner looking for a solid foundation in O Level Physics or an advanced student looking for a refresher on the O Level Physics concepts, this guide serves as your beacon in the vast sea.
It's also important to take note that this guide serves as a reference for basic concepts only. For a more advanced learning, whatsapp us about it!
O Levels Physics Notes for all students
Available to you at all times
We would like to bring to your attention some major changes in the 2024 O Level Physics Syllabus, which you can view in detail from SEAB (Singapore Examinations and Assessment Board) here.
Here are some of the key changes:
-
The entire topic of 'Temperature' has been removed from the syllabus.
-
'Sound' is no longer a standalone topic and has been incorporated under 'General Properties of Waves.'
-
The topic of 'Radioactivity' has been newly introduced.
These significant adjustments mean that relying solely on past year papers for revision may not fully prepare you for the challenges of the new syllabus. But at Aspire Thinking, we are one step ahead.
We have updated our notes and lesson plans to align with the 2024 O Level Physics Syllabus. Our classes are specifically catered to help you navigate these changes, ensuring you are well-equipped to excel in the examinations.
For more information on how our classes can prepare you for the new syllabus, please feel free to WhatsApp us.

No matter where you are, the O Level Physics notes will always be here, ready to provide you the information you need to solve O Level Physics Problems. To help bring you to relevant contents without the need for excessive scrolling, here is the table of contents:
We have meticulously designed the O level Physics Notes to be as accurate and error-free as possible. Our team has gone through multiple rounds of reviews to ensure the quality of the content.
However, nobody is perfect. If you do come across any errors, omissions, or areas for improvement, we kindly ask that you bring them to our attention. Your feedback is invaluable to us and helps improve the learning experience for everyone.
Thank you for your cooperation and understanding.
© 2023, Aspire Thinking Learning Centre. All rights reserved.
This worksheet is for personal or educational use only. No part of this worksheet may be reproduced, distributed, or transmitted in any form or by any means, including photocopying, recording, or other electronic or mechanical methods, without the prior written permission of the copyright holder, except in the case of brief quotations embodied in critical reviews and certain other noncommercial uses permitted by copyright law. For permission requests, write to the copyright holder at [email protected].
Kinematics
Author's Notes:
Kinematics is one of the most challenging topics for O Level Physics Students as it involves a lot of graphical and mathematical solutions. Therefore, it's important to work on your E Maths foundation concurrently.
Core Concepts
Distance and Displacement
-
Distance: The length of the path taken by an object, measured in meters ( SI Unit: m). It's a scalar quantity.
-
Displacement: The shortest distance between the initial and final position of an object. It is a vector quantity, meaning it has both magnitude and direction. SI Unit is also meters (m).
Speed and Velocity
-
Speed: The rate of change of distance traveled. SI Unit is meters per second (m/s). It is a scalar quantity.
-
Velocity: Rate of change of displacement. In a way, it can be understood as speed with direction, making it a vector quantity i.e. it has both magnitude and direction.
-
Average speed = Total Distance traveled / Total Time Taken
Acceleration
-
Acceleration: The rate of change of velocity. SI Unit is meters per second squared (m/s^2).
-
Formula - a = (v-u)/t where a = acceleration, v = final velocity, u = initial velocity, t = time taken. When using this formula, we assume that a is either a constant or average value.
Graphs
-
Gradient of speed-time or velocity-time graph = acceleration. Do note that it's not possible to interpret the direction of acceleration from a speed-time graph unless the question mentions that the object is traveling in 1 direction only.
-
Gradient of distance-time graph = speed
-
Gradient of displacement-time graph = velocity
-
Area under speed-time graph = distance
-
Area under velocity-time graph = displacement
Interpreting graphs
-
If the gradient of a distance-time graph increases, the object is increasing in its speed
-
If the gradient of a displacement-time graph increases, the object is increasing in its velocity
-
if the gradient of a speed-time/velocity-time graph increases, the object is increasing in acceleration
Equations of Motion (optional)
These equations describe the motion of objects under constant acceleration.
-
v = u + at
-
s = ut + 1/2at^2
-
v^2 = u^2 + 2as
Where v is the final velocity, u is the initial velocity, a is the acceleration, t is the time, and s is the displacement.
**not all schools teach this and is considered optional in the syllabus.
Problem-solving Techniques
-
Drawing Diagrams
-
Sketching motion diagrams or displacement-time or velocity/speed-time graphs can help in visualizing problems better.
-
Using the right Formulae is key. Write down relevant formulae before solving the question.
-
Based on what quantities are given and what needs to be found, choose the appropriate formula and plug in the numbers.
-
Always check the units for each quantity to ensure they are consistent. Convert them if necessary.
Common Pitfalls
-
Confusing distance with displacement.
-
Neglecting to consider the direction for vector quantities like velocity and acceleration.
-
Forgetting to check units and making incorrect conversions.
Dynamics
Author's Notes:
Many O Level Physics questions combine the concepts of Kinematics and Dynamics. It is often important to Master Kinematics first before Dynamics.
Core Concepts
Force
-
Definition: A force is a push or pull acting upon an object, measured in newtons (N).
-
Effects: A force can change the state of motion of an object, alter its shape, or both.
-
A force is vector quantity.
Types of Forces
-
Forces can be contact or non-contact
-
Weight (non-contact): The gravitational force acting on an object, given by W=mg, where m is the mass, and g is the gravitational acceleration.
-
Tension (contact): The pulling force transmitted through a string, rope, or wire.
-
Friction (contact): The force that opposes the relative motion between two surfaces in contact. It can be static (when the object is stationary) or kinetic (when the object is moving).
-
Normal reaction (contact): Reaction force produced when a force is acting on a surface. The normal reaction force is always perpendicular to the surface.
Newton’s Laws of Motion
Critical for O Level Physics, these laws describe the relationship between a body and the forces acting upon it.
-
First Law: An object remains at rest or in uniform motion unless acted upon by an net external force.
-
Second Law: The acceleration of an object is directly proportional to the net force acting upon it and inversely proportional to its mass. Mathematically, Fnet=ma.
-
Third Law: For every action, there's an equal and opposite reaction.
Inertia
-
Defined as reluctance of a body to change its current state of motion.
-
Depends only on mass - a body with greater mass has greater inertia.
Balanced Forces
When forces are balanced, the net force acting on an object is zero. This means that the object will not accelerate; it will either remain at rest or continue to move at a constant velocity. For example, if you place a book on a table, the gravitational force pulling the book downward is balanced by the normal force from the table pushing upward. Since the forces are balanced, the book remains at rest.
Unbalanced Forces
Unbalanced forces occur when the net force acting on an object is not zero. This will result in a change in the object's velocity, meaning the object will accelerate. For instance, if you push a stationary car, the force you exert is unbalanced because it is not being exactly countered by another force in the opposite direction. As a result, the car will start to move (accelerate) in the direction of the force you applied.
Terminal Velocity
Terminal velocity is a concept in physics that describes the maximum constant speed reached by a freely falling object under the influence of gravity and subjected to drag forces (aka air resistance) from the atmosphere. Air resistance increases with increasing velocity. At terminal velocity, the force due to air resistance equals the gravitational force acting on the object, resulting in a net force of zero. At this point, the object stops accelerating and falls at a constant speed.
Scaled Vector Diagrams:
Used to find unknown force or resultant force due to forces that are not parallel to each other. Aside from forces, it can be used to solve other types of vectors eg. velocity, displacement
1. Set the scale such that your diagram fits properly in the space given. The triangle that you draw cannot be too small (as geometric construction errors would be amplified in your answer).
2. Decide to use the head to tail method or parallelogram method.
3. Always start with the weight whenever possible as the weight is vertically down and so does not require an angle.
4. Finish constructing the triangle or parallelogram and measure the resultant or balancing force.
5. Don't forget to measure the angle the resultant or balancing force makes with other forces as that would give you the direction.
Common Pitfalls
-
Always draw free body diagram to solve dynamics issues
-
Objects can still move even when forces are balanced
- vectors can only be shifted in a scaled vector diagram. They cannot be rotated.
- Check units and determine if they need to be converted.
Turning Effects of Forces
Core Concepts
Moment (Torque) of a Force
-
Definition : The turning effect produced by a force acting on an object about a pivot point. It is mathematically given as the product of the force and the perpendicular distance from the pivot to the line of action of the force.
-
Formula : Moment = Force × Perpendicular Distance
-
Units : The unit for the moment of force is the Newton-meter (Nm).
Principle of Moments
For an object to be in equilibrium (i.e., not rotating), the total clockwise moment about any point must be equal to the total anti-clockwise moment about that same point. This principle is crucial for understanding the balance of forces in real-life applications like seesaws, levers, and bridges.
An object in equilibrium must also have zero net force (translational equilibrium).
Center of Gravity
The center of gravity is the point at which the entire weight of an object seems to act. For uniform objects, like a uniform rod or a flat, symmetrical sheet, the center of gravity lies at its geometrical center (i.e. the middle).
Stability
Objects are classified based on their stability:
-
Stable Equilibrium: An object will return to its original position after a slight tilt. This is because its center of mass is below the pivot point.
-
Unstable Equilibrium: A slight tilt will cause the object to topple. Here, the center of mass is above the pivot point.
-
Neutral Equilibrium: Tilting doesn't affect the object's position. The center of mass remains at the same height.
Applications
Understanding the turning effects of forces has numerous applications:
-
Levers : Objects that rotate about a pivot, like scissors or pliers, use the principle of moments to multiply force.
-
Balancing Objects : From standing humans to towering skyscrapers, the turning effects of forces are at play to ensure stability.
-
Vehicle Design : Vehicles are designed with considerations for their center of gravity to prevent toppling.
Pressure
Core Concepts
Definition of Pressure
-
Pressure: Pressure is defined as the force exerted per unit area. It's the measure of how much force is spread over a specific area.
-
Formula: Pressure(P) = Force(F)/Area(A)
-
Units: The SI unit of pressure is Pascal (Pa), where 1 Pa = 1 N/m^2.
Atmospheric Pressure
Atmospheric pressure refers to the force exerted by the weight of the atmosphere on a given surface or at a point. As altitude increases, atmospheric pressure decreases because there is less air above to exert a force. It's also worthwhile to take note that atmospheric pressure acts in all directions.
Pressure in Liquids
-
Pressure in a liquid increases with depth due to the weight of the liquid above.
-
The pressure at a particular depth is the same in all directions.
-
Liquid pressure depends on:
-
Depth of the point in the liquid
-
Density of the liquid (Density can be found taking the mass and dividing it by its volume)
-
Gravitational acceleration (g)
-
-
Formula: P = h×ρ×g , where h is the depth, ρ is the density of the liquid, and g is the gravitational acceleration.
Applications of Liquid Pressure
-
Hydraulic Systems: These systems use the principles of liquid pressure to amplify force, like in hydraulic brakes or lifts.
-
Manometer and Barometers: Devices used to measure gas or atmospheric pressure based on the height of the liquid column.
-
Submarines: Their design and operation revolve around managing external water pressure at different depths.
Factors Affecting Pressure
-
Force Applied: Pressure is directly proportional to the force applied.
-
Area Over Which Force is Applied: Pressure is inversely proportional to the area. Smaller areas will experience higher pressures for the same force.
Practical Implications
Understanding pressure has led to:
-
Improved Weather Predictions: Atmospheric pressure readings help in predicting weather patterns and storm formations.
-
Enhanced Engineering Designs: Structures like dams and skyscrapers are designed keeping in mind the pressure they will experience.
-
Measuring temperature: By keeping a gas in a fixed volume and connecting a manometer at one end, it is possible to measure the temperature with proper calibrations.
Hydraulic Press
A hydraulic press is a machine that uses a hydraulic cylinder to generate a compressive force. By using the hydraulic equivalent of a mechanical lever, the press amplifies a small force over a larger distance, essentially making tasks easier or more efficient.
Basic Concepts
-
Pascal's Principle: This principle states that in a confined fluid at rest, any change in pressure applied at any point in the fluid is transmitted undiminished throughout the fluid in all directions.
F1/A1=F2/A2
-
Force Amplification: A hydraulic press allows a small force applied to a small area to be transformed into a larger force applied to a larger area.
F2=(A2/A1)×F1 <--- derived from pt 1.
-
Mechanical Advantage: It is the ratio of the force produced by the machine to the force applied to it.
M.A.=F2/F1 (optional to learn/ not in syllabus)
-
Work In = Work Out: The energy or work going into the hydraulic system must be equal to the work coming out.
W1=W2
F1×d1=F2×d2 where d1 and d2 are distances traveled by the pistons respectively.
This is an application of conservation of energy. -
Hydraulic Fluid: It is the incompressible fluid through which pressure is applied in the hydraulic system. Usually, it's oil.
-
Cylinders and Pistons: The hydraulic press consists of a large and a small cylinder, each filled with hydraulic fluid. A piston in each cylinder applies and receives pressure.
Applications
-
Car repair shops for lifting vehicles
-
Manufacturing processes
-
Plastic and metal forming
-
Recycling plants
-
Laboratory applications
Energy
Core Concepts
Definition of Energy
-
Energy: A property of objects which can be transferred to other objects or converted into different forms, but cannot be created or destroyed.
-
Units: The SI unit of energy is the Joule (J).
Types of Energy
-
Kinetic Energy (KE): Energy of motion. It's given by the formula: KE = 1/2mv^2, where m is the mass and v is the velocity.
-
Potential Energy (PE): Energy stored within a system. Two primary forms include:
-
Gravitational Potential Energy : Energy an object possesses due to its position in a gravitational field. Given by: PE = mgh, where h is the height above a reference point.
-
Elastic Potential Energy : Energy stored when objects are compressed or stretched, like in a spring.
-
-
Chemical Potential Energy : Energy stored in the bonds of chemical compounds.
-
Nuclear Energy : Energy released during nuclear reactions due to the conversion of mass into energy.
-
Thermal (Heat) Energy : The internal energy present in a system due to the vibration and movement of molecules at a certain temperature.
-
Electrical Energy: Energy that drives charged particles across an electrical conductor
Conservation of Energy
The law of conservation of energy states that energy cannot be created or destroyed but only transformed from one form to another. In closed systems, the total energy remains constant.
Work Done
-
Work is said to be done when a force applied on an object moves the object in the direction of the force.
-
Units: The SI unit of work is the Joule (J).
-
Direction: Work is a scalar quantity, which means it does not have direction. However, the force and displacement involved in doing work are vector quantities.
-
The formula for work done when a constant force F is applied to an object, moving it a distance d in the direction of the force is:
W=F×d
Where: W is the work done, F is the magnitude of the force, d is the distance moved
Power
-
Definition: Power is the rate at which work is done or energy is transferred. In simpler terms, it measures how quickly energy is used or produced.
-
Units: The SI unit of power is the Watt (W), which is equivalent to one Joule per second (J/s).
-
Scalar Quantity: Power is a scalar, meaning it has magnitude but no direction.
-
Power in terms of Work and Time:
P=W/t Where:P is the power, W is the work done, t is the time taken -
Power in terms of Constant Force and average Velocity:
-
P=F×v Where: P is the power, F is the force, v is the velocity
Energy Efficiency
Not all energy transferred in a system performs useful work. The efficiency of an energy transfer can be calculated using : Efficiency = Useful Energy Output/Total Energy Input × 100% or Efficiency = Useful Power Output/Total Power Input × 100%
Common Pitfalls
-
When calculating work done, always choose the distance parallel to the force.
-
When finding average friction force, it's always important to consider the formula W=FxD
-
When solving conversation of energy questions, consider total energy at point A and then at B and equate them.
Practical Implications
-
Renewable Energy Sources: Solar, wind, and hydroelectric systems convert natural energy sources into electricity.
-
Transport: Vehicles convert chemical energy in fuel into kinetic energy.
-
Household Appliances: Devices like heaters convert electrical energy into heat energy.
-
Industry: Many manufacturing processes involve transforming energy from one form to another to produce goods.
Kinetic Particle Model of Movement
Core Concepts
Basic Postulates
The Kinetic Particle Model is built on several fundamental assumptions:
-
All matter is composed of tiny, discrete particles: These can be atoms, molecules, or ions.
-
Particles are in constant, random motion: This motion increases with temperature.
-
All particles possess energy: This energy can be kinetic (due to their motion) or potential (due to their position).
-
Forces exist between particles: These forces, which can be attractive or repulsive, play a significant role in determining the state of the matter.
Behavior of Particles in Different States
-
Solids: Particles are closely packed in an orderly arrangement. They vibrate about fixed positions but don't move freely.
-
Liquids: Particles are close but can move past each other. They have more energy than particles in solids.
-
Gases: Particles are widely spaced and move freely at high speeds in all directions, possessing the most energy among the three states.
Changes in State
The addition or removal of energy (usually in the form of heat) can cause matter to change from one state to another:
-
Melting: Solid to Liquid
-
Freezing: Liquid to Solid
-
Boiling/Evaporation: Liquid to Gas
-
Condensation: Gas to Liquid
-
Sublimation: Direct change from Solid to Gas without passing through the liquid state.
Brownian Motion
This is the random, erratic motion of smoke or dust particles in a gas, as observed under a microscope. It provides evidence for the continuous, random motion of gas particles. It is important to note that dust particles are solid state and therefore, allows us to observe them.
Diffusion
Diffusion is the process by which particles spread out from an area of high concentration to an area of low concentration. It's more rapid in gases and slower in liquids due to the differences in particle spacing and energy.
Pressure of a gas
The pressure exerted by a gas is fundamentally linked to the motion of its particles, usually atoms or molecules. This relationship is most clearly described in the kinetic theory of gases, which provides a microscopic explanation for macroscopic properties like pressure, temperature, and volume.
Here's how the motion of gas particles relates to pressure:
Basic Concepts
-
Random Motion: Gas particles are in constant, random motion, colliding with each other and the walls of the container they are in.
-
Collisions: Gas particles collide with the walls or each other randomly with no loss in kinetic energy
-
Force exerted: During a collision with the wall of a container, a particle exerts a force on the wall.
-
Frequency of Collisions: The more frequent the collisions and the greater the speed (and thus the kinetic energy) of the particles, the greater the force they exert on the wall.
-
Force and Area: Pressure is defined as force per unit area. In the context of a gas, it's the average force exerted by the particles colliding with a unit area of the container walls.
Temperature of a body due to kinetic energy of particles
The temperature of a body is a measure of the average kinetic energy of its constituent particles, whether they be atoms, molecules, or ions. When the temperature of a body rises, it indicates that the average kinetic energy of its particles is also increasing.
Gas Laws (Optional)
These laws describe the behavior of gases under varying conditions:
-
Boyle’s Law : For a fixed mass of gas at a constant temperature, pressure is inversely proportional to volume. This means that a decrease in volume occupied by a gas would mean an increase in pressure exerted by the same gas.
-
Charles’s Law : For a fixed mass of gas at constant pressure, volume is directly proportional to its absolute temperature.
Real-world Applications
-
Evaporation as a Cooling Process: When we sweat, the liquid sweat on our skin evaporates, taking away heat energy from our body and thereby cooling us down.
-
Perfume Spreading in a Room: This is an example of diffusion, where the perfume molecules spread out due to their random motion.
-
Solid Air Fresheners: These fresheners sublimate, going directly from the solid state to the gaseous state, releasing fragrance over time.
Thermal Processes
Core Concepts
Definition of Internal Energy
-
The internal energy of an object is the sum of all the kinetic and potential energy of its particles. It increases as temperature rises.
Heat and Temperature
-
Heat : A form of energy that transfers between bodies due to a temperature difference. It flows from a hotter body to a colder one.
-
Temperature : A measure of the average kinetic energy of particles in a body. It determines the direction of heat flow --> Heat flows from a region of high temperature to a region of low temperature
-
If all regions are of the same temperature, there is no net heat flow between them. This is also known as the zeroth law of thermodynamics.
-
Heat is not equal to temperature.
Methods of Heat Transfer
-
Conduction
-
The transfer of heat within a material or between materials in direct contact, without the movement of the material itself. It's most efficient in solids due to the closeness of the particles.
-
Particles in a Solid: In a solid, particles are closely packed together in a fixed arrangement. While they can't move freely, they can vibrate in place.
-
Kinetic Energy: The kinetic energy of particles corresponds to their temperature. Higher kinetic energy (and thus higher temperature) leads to more vigorous vibrations.
-
Neighbor Interactions: Particles in a solid are in close contact with their neighbors. When one particle vibrates, it tends to bump into its neighboring particles.
-
Initial Heat Source: When one end of a solid material is heated, the particles at that end gain kinetic energy and begin to vibrate more vigorously.
-
Transfer of Energy: These energetic particles then collide with their immediate neighbors, transferring some of their kinetic energy to them.
-
Chain Reaction: As the neighboring particles gain kinetic energy, they too start vibrating more energetically and pass on the energy to their neighbors. This creates a domino effect, transferring energy from one end of the solid to the other.
-
Temperature Gradient: Over time, this transfer of kinetic energy from particle to particle results in a temperature gradient along the material, with one end being hotter than the other.
-
Equilibrium: Eventually, a thermal equilibrium is reached where heat energy is evenly distributed among all particles, making the temperature uniform throughout the material (assuming no heat is lost to the environment or added to the system).
-
-
Convection
-
The transfer of heat by the actual movement of fluids (liquids or gases). It is driven by density differences caused by temperature variations.
-
Warmer fluid particles have more kinetic energy, and they are less dense than cooler particles because they move apart from each other, increasing the volume they occupy.
-
Less dense (warmer) fluid will tend to rise while denser (cooler) fluid will tend to sink.
-
Example:
-
When a portion of a fluid is heated, the particles in that region gain kinetic energy and move more vigorously.
-
As they gain kinetic energy, these particles tend to move farther apart from each other, causing the fluid to expand and reduce in density.
-
Rising Motion: Because of this reduction in density, the warmer fluid rises
-
The cooler, denser fluid sinks, making room for more warm fluid to rise. This establishes a convective cycle or circulation.
-
Heat Distribution: Through this cycle, heat is effectively transferred from the hotter region to the cooler region of the fluid.
-
-
-
Radiation
-
The transfer of heat in the form of infrared radiation. It doesn’t require a medium and can occur in a vacuum.
-
This is why, for example, the Sun's energy can reach the Earth through the vacuum of outer space. The rate of this energy transfer is influenced by several factors related to the body emitting or absorbing the radiation.
-
Surface Color and Texture
-
Color: Dark-colored surfaces are generally better at absorbing radiation because they have higher emissivity. Light-colored surfaces reflect more radiation and thus have lower emissivity.
-
Texture: Matte or rough surfaces are typically better at absorbing and emitting radiation compared to smooth, shiny surfaces, which are better at reflecting radiation.
-
-
Surface Temperature
-
Higher the surface temperature, greater the rate of radiation
-
-
Temperature Difference
-
The rate of heat transfer between two objects also depends on the temperature difference between them. A greater temperature difference leads to faster heat transfer.
-
-
Surface Area
-
Area Effect: The larger the surface area, the more radiation can be emitted or absorbed by the body. For instance, radiators are designed with fins to increase surface area and thereby enhance the rate of heat transfer by radiation.
-
-
-
Vacuum Flask
A vacuum flask typically consists of a double-walled container. The space between the two walls is evacuated to create a vacuum.
-
Minimizing Conduction: The vacuum between the walls eliminates air, a medium through which heat could be conducted. This minimizes heat loss through conduction.
-
Minimizing Convection: The absence of air also prevents heat loss through convection currents, as there's no fluid to carry away the heat.
-
The inner surfaces of the walls are often coated with a reflective material like silver.
-
The reflective coating helps to reflect radiant heat back into the beverage, thus minimizing heat loss through radiation.
-
The flask is sealed with an insulated stopper, usually made from materials that are poor conductors of heat like plastic or cork.
-
The stopper prevents the warm air inside the flask from escaping and thus the set-up of convection current, further reducing heat loss.
Real-world Implications
-
Insulation: Understanding conduction has led to better insulation materials, keeping homes warmer or cooler.
-
Weather Patterns: Convection currents play a significant role in shaping global weather patterns and climatic zones.
-
Cooking: Microwave ovens use radiation, while boiling pots utilize convection, highlighting the importance of thermal processes in daily life.
Thermal Properties
of Matter
Core Concepts
Temperature
-
Temperature : A measure of the hotness or coldness of a body. It indicates the direction of heat flow and is directly proportional to the average kinetic energy of the particles in a substance.
Internal Energy
-
Internal Energy : The total energy contained within a system due to the kinetic and potential energies of its particles. It increases with an increase in temperature or a change in the state of matter.
Heat
-
Heat : A form of energy that transfers between systems or objects due to a difference in temperature. It naturally flows from a region of higher temperature to a region of lower temperature.
Specific Heat Capacity
-
Specific Heat Capacity : The amount of heat energy required to raise the temperature of a unit mass of a substance by one degree Celsius without any change of state.
-
Formula : Q = mcΔT
Latent Heat
-
Latent Heat : The heat energy absorbed or released by a substance during a change in its state, without any change in temperature.
-
Types :
-
Latent Heat of Fusion: Associated with melting/freezing processes.
-
Latent Heat of Vaporization: Related to boiling/condensing processes.
-
Expansion and Contraction of Matter
As temperature changes, matter tends to expand or contract:
-
Solids : Have a regular arrangement of closely packed particles. They generally expand/contract the least with temperature changes.
-
Liquids : Have a less regular arrangement and typically expand more than solids.
-
Gases : Have widely spaced particles and expand much more than solids and liquids for the same temperature change.
Anomalous Expansion of Water
Water, unlike most substances, expands as it freezes and contracts as it melts. This unique property has significant implications, particularly in aquatic ecosystems.
Boiling vs Evaporation
Boiling and evaporation are both phase transitions where a substance changes from a liquid to a gas, but they occur under different conditions and in different manners. Here's how they differ:
Boiling
-
Temperature: Boiling occurs at a specific temperature known as the boiling point, which varies depending on the atmospheric pressure. For water at sea level, this is 100°C.
-
Location: Boiling happens throughout the entire volume of the liquid, not just at the surface. Bubbles of vapor form within the liquid and rise to the surface.
-
Energy Input: Boiling usually requires an external source of heat to maintain the temperature at the boiling point.
-
Pressure: The boiling point can be altered by changing the pressure. Lower pressure lowers the boiling point, and higher pressure raises it.
-
Rate: Boiling is generally a faster process, as it involves the whole volume of the liquid turning into vapor.
Evaporation
-
Temperature: Evaporation can occur at any temperature, not just at the boiling point. It's common to see evaporation at room temperature.
-
Location: Evaporation takes place only at the surface of the liquid.
-
Energy Input: Evaporation doesn't require an external source of heat. The existing kinetic energy of the liquid molecules is sufficient.
-
Pressure: Evaporation can occur at any pressure and is not dependent on pressure like boiling. However, higher pressures can reduce the rate of evaporation.
-
Rate: Evaporation is generally a slower process, and it may or may not remove a significant volume of the liquid.
Practical Implications
-
Engineers take into account the expansion and contraction of building materials due to temperature changes when designing structures.
-
Meteorologists rely on the principles of thermal properties to understand and predict weather patterns.
-
Kitchen appliances, like refrigerators and ovens, operate based on the principles of heat transfer and the thermal properties of matter.
General Properties of Waves
Core Concepts
Definition of a Wave
-
Wave: A disturbance that transfers energy from one point to another without the transfer of matter.
Types of Waves
-
Mechanical Waves : Require a medium (like air, water, or a solid substance) to transfer energy. Examples include sound waves and seismic waves.
-
Electromagnetic Waves : Do not require a medium and can travel through a vacuum. Examples include light, radio waves, and X-rays.
Wave Terminology
-
Amplitude : The maximum displacement of the wave from its equilibrium position.
-
Crest: Highest point on a wave
-
Trough: Lowest point on a wave
-
Wavelength : The distance between two successive points in phase, such as between two consecutive crests or troughs.
-
Frequency : The number of complete wave cycles passing a fixed point in one second, measured in Hertz (Hz).
-
Period : The time taken for one complete wave cycle, which is the inverse of frequency.
-
Wave Speed : The speed at which a wave travels, calculated as Wave Speed = Frequency × Wavelength
Wavefront and Rays
-
Wavefront: Represents the imaginary line joining all the points on a wave that are in the same phase. For instance, connecting all the crests (of the same phase) of a water wave represents a wavefront.
Transverse and Longitudinal Waves
-
Transverse Waves : The particle movement is perpendicular to the direction of the wave propagation. Light and radio waves are examples.
-
Longitudinal Waves : The particle movement is parallel to the direction of the wave propagation. Sound waves in air are a typical example.
Reflection, Refraction, and Diffraction
-
Reflection : The bouncing back of a wave when it encounters a barrier. The law of reflection states that the angle of incidence equals the angle of reflection.
-
Refraction : The change in direction of a wave as it passes from one medium to another, often accompanied by a change in speed.
Production of Sound and the Characteristics
-
Vibration: When an object vibrates, it moves back and forth rapidly around an equilibrium position. This could be the string of a guitar, the diaphragm of a speaker, or even vocal cords in the human throat.
-
Compression and Rarefaction: The vibrations create areas of compression and rarefaction in the medium surrounding them. In a compression, the particles in the medium are pushed close together, while in a rarefaction, they are pulled farther apart.
-
Wave Propagation: These areas of compression and rarefaction propagate through the medium as a longitudinal wave, allowing sound energy to travel from one point to another.
-
Particle Interaction: Sound needs a medium because it travels by causing particles in that medium to vibrate. In a gas like air, sound moves by causing air molecules to bump into each other, transferring energy as they go.
-
Speed of Sound: The speed at which sound travels depends on the properties of the medium. For example, sound travels faster in water and even faster in solids like steel compared to air.
-
No Sound in a Vacuum: In a vacuum, there are no particles to transmit the sound, which is why sound cannot travel through a vacuum.
-
Medium Characteristics: The density of the medium affect how well it can transmit sound. Denser mediums transmit sound more effectively and at higher speeds.
-
Amplitude: The amplitude of a sound wave refers to the maximum displacement of particles in the medium from their equilibrium positions. It gives a measure of the energy of the wave.
-
Connection: A sound wave with a higher amplitude will cause particles in the medium (e.g., air molecules) to move more vigorously, resulting in higher sound pressure levels. This higher pressure level is what our ears perceive as greater loudness.
-
Frequency: Frequency refers to the number of oscillations or cycles that occur in a unit time. In sound waves, it is measured in Hertz (Hz).
-
Pitch: Pitch is how high or low a sound seems to us. It is our auditory perception of the frequency of a sound wave.
-
Connection: Higher frequency sound waves are generally perceived as having a higher pitch, while lower frequency sound waves are perceived as having a lower pitch.
Sound and Echo
-
Initial Sound: An initial sound or "pulse" is emitted from a source.
-
Travel: The sound waves travel through a medium, usually air, until they reach a reflecting surface such as a wall or a mountain.
-
Reflection: Upon reaching this surface, the sound waves are reflected back towards the source or receiver.
-
Time Delay: Because sound travels at a finite speed V (approximately 340 m/s in air at room temperature), there is a noticeable time delay between when the original sound is made and when the echo is heard.
-
The distance (d) to the reflecting object can be calculated using the formula: V = 2d/t
-
The division by 2 is necessary because the sound has to travel to the object and then back again, so the time measured (t) is actually the time for a round trip.
Ultrasound
Ultrasound technology relies on sound waves with frequencies above the range of human hearing, typically greater than 20 kHz. These high-frequency sound waves have special properties that make them useful for a variety of applications, such as sonar systems and medical imaging.
Sonar
-
Basic Principle: A transducer sends out a pulse of ultrasound waves into the water. These waves travel through the water until they hit an object, like a school of fish or the seafloor, and are reflected back to the transducer.
-
Distance Measurement: The time it takes for the sound waves to return is measured. Knowing the speed of sound in water (about 1,500 m/s), the distance to the object can be calculated.
-
Mapping and Navigation: In applications like submarine navigation or underwater mapping, multiple sound pulses can be used to create a detailed image or map of the underwater environment.
-
Fish Finding: Sonar is often used in fishing to locate schools of fish.
Medical
-
Basic Principle: A transducer is placed on the skin and emits ultrasound waves into the body. These waves are reflected off internal structures and captured by the same or a different transducer.
-
Image Formation: The time it takes for the reflections to come back is measured, and using the speed of sound in tissue, an image of the internal structure can be formed.
-
Applications: Ultrasound is commonly used to visualize soft tissues that don't show up well on X-rays. This includes imaging of organs like the heart, liver, and kidneys, as well as the examination of fetuses during pregnancy.
-
Safety: Ultrasound is generally considered to be safe for medical imaging, as it does not involve ionizing radiation.
Practical Implications
-
Medical Imaging : Techniques like ultrasound and X-rays leverage the properties of waves to visualize the inner workings of the human body.
-
Telecommunications : Mobile phones, radios, and television broadcasts depend on electromagnetic waves to transfer information across distances.
-
Acoustics : Understanding sound waves helps in the design of concert halls, theaters, and soundproofing solutions.
Electro-
magnetic Spectrum
Core Concepts
What is Electromagnetic Radiation?
-
Electromagnetic Radiation: These are waves of electric and magnetic fields that move through space at the speed of light (3x10^8 m/s). Unlike mechanical waves, they don't require a medium to propagate, allowing them to travel through the vacuum of space.
Components of the Electromagnetic Spectrum
The electromagnetic spectrum is vast, ranging from waves with very short wavelengths (and high frequencies) to those with long wavelengths (and low frequencies). Here's a breakdown of the waves from longest to shortest wavelength:
-
Radio Waves: These have the longest wavelength and are used in all wireless communications, including AM and FM radio, TV, and cell phones.
-
Microwaves: Used in microwave ovens and certain communication devices.
-
Infrared (IR): Felt as heat and used in remote controls, night-vision equipment, and thermal imaging.
-
Visible Light: The only part of the spectrum we can see. It's emitted by the sun, light bulbs, and anything else that produces visible light. Visible can be broken down into its colors ROYGBIV - Red Orange Yellow Green Blue Indigo Violet. Red light has the longest wavelength
-
Ultraviolet (UV): Emitted by the sun and responsible for tanning, sunburn, and the production of vitamin D in our skin. Prolonged exposure can be harmful.
-
X-rays: Used in medical imaging and airport security.
-
Gamma Rays: Have the shortest wavelength and highest energy. They're produced in nuclear reactions and certain types of radioactive decay.
Properties and Uses
Each component of the electromagnetic spectrum has unique properties that make it suitable for specific applications:
-
Radio Waves: Used in broadcasting for RFID tags, radio and TV
-
Microwaves: Used in cooking and satellite communication.
-
Infrared: Used in thermal imaging and remote controls.
-
Visible Light: Used in photography, vision, and illumination.
-
Ultraviolet: Used in sterilization and black lights.
-
X-rays: Used in medical diagnostics and metal flaws detection
-
Gamma Rays: Used in cancer treatments
Ionizing Effects
-
Ultraviolet Radiation: Short-term exposure to UV radiation can cause sunburn. Long-term exposure can lead to premature aging of the skin and increase the risk of skin cancer.
-
X-rays and Gamma Rays: These forms of ionizing radiation have enough energy to remove tightly bound electrons from atoms, creating ions. This can damage or kill cells, potentially leading to radiation sickness, cancer, or genetic mutations.
Safety Concerns
While electromagnetic waves are integral to our modern life, certain types, like UV rays, X-rays, and gamma rays, can be harmful in large doses or prolonged exposure. Understanding the safety guidelines for these waves is crucial.
Light
Core Concepts
Nature of Light
-
Light: It is a form of electromagnetic radiation that is detectable by the human eye. Within the electromagnetic spectrum, it falls in the "visible light" category.
Normal
-
The "normal" is an imaginary line that is perpendicular to the surface where the reflection is occurring. It is usually drawn as a dashed line extending outwards from the point of incidence, which is the point where the incoming light ray strikes the surface.
Angle of Incidence (∠i)
-
The angle of incidence is the angle between the incoming light ray and the normal. It is usually denoted by ∠i∠i and is measured in degrees. The angle is measured in the plane of incidence, which contains the incoming ray and the normal.
Angle of Reflection (∠r)
-
The angle of reflection is the angle between the reflected light ray and the normal. It is usually denoted by ∠r∠r and is also measured in degrees. This angle is measured in the plane of reflection, which contains the reflected ray and the normal.
Laws of Reflection
-
First Law: The angle of incidence is equal to the angle of reflection. Mathematically, this can be represented as:
∠i=∠r
-
Second Law: The incident ray, the reflected ray, and the normal all lie in the same plane.
Plane Mirrors
They produce virtual, upright, and laterally inverted images with the object distance being equal to the image distance.
Refraction of Light
-
Refraction: The bending of light as it travels from one medium to another, caused by a change in speed.
-
Snell’s Law: It relates the angles of incidence and refraction to the refractive indices of the two media. Given as : n1sinθ1 = n2sinθ2
-
When light enters an optically denser medium from air, snell's law becomes sin(i)/sin(r) = n
-
When light exits an optically denser medium into air/vacuum, snell's law becomes sin(i)/sin(r) = 1/n
-
When light exits an optically denser medium from air/vacuum and travels along the boundary (where r=90 Deg), snell's law becomes sin(c)= 1/n where c is the critical angle.
-
Total Internal Reflection: Occurs when light traveling from a denser to a rarer medium hits the boundary at an angle greater than the critical angle, causing the light to be reflected back entirely.
Dispersion of Light
-
Dispersion: The splitting of white light into its constituent colors when passing through a medium like a prism. This happens because different colors (or wavelengths) of light are refracted by different amounts.
Lenses
-
Converging (Convex) Lenses: They bring parallel rays of light to a focus. They can produce real or virtual, magnified or reduced images based on the object's position.
-
When parallel rays of light enter the lens, they refract or bend towards the normal line (an imaginary line perpendicular to the surface) due to the lens's shape and the refractive properties of the material it's made from. As the rays exit the lens, they refract again, this time bending away from the normal. The net effect of these refractions is that the rays converge at a point called the focal point.
-
-
Diverging (Concave) Lenses: They spread out parallel rays of light. They always produce virtual, upright, and diminished images.
-
Focal Length: The distance from the lens to the focal point is known as the focal length (ff). The focal length is positive for converging lenses.
-
Principal Axis: This is an imaginary line that passes through the center of the lens and is perpendicular to both surfaces. Light rays parallel to the principal axis after refraction will pass through the focal point.
-
Optical Center: A point in the middle of the lens where light rays pass through without any deviation.
-
Real Image: Formed when the light rays actually converge at a point. Real images can be projected onto a screen and are inverted (upside-down).
-
Virtual Image: Formed when the light rays do not actually converge but appear to diverge from a point when extended backward. Virtual images are upright and cannot be projected onto a screen.
You can check out this optics bench interactive to get a better feel of the concept.
Optical Instruments
Instruments like the human eye, microscopes, and telescopes utilize the principles of lenses to magnify or project images.
Wavefront and Rays
-
Wavefront: It represents the line joining all the points on a wave that are in the same phase.
-
Ray: A line drawn to indicate the direction of the wave's energy flow.
Practical Implications
-
Medicine: Instruments like endoscopes utilize the principles of light reflection and transmission to visualize internal body structures.
-
Astronomy: Telescopes employ lenses or mirrors to collect and focus light from distant celestial objects.
-
Photography: Cameras use converging lenses to focus light onto film or sensors, capturing images.
Author's Note
The topic of Light in the O Level Physics syllabus can be particularly challenging due to its intersection with geometry, ray-tracing, and trigonometry. It is a complex subject that requires both a strong understanding of theory and a knack for practical application.
To succeed in this area, I would highly recommend that you make it a habit to sketch rays for almost every question you encounter. This practice helps you to visualize the problem at hand and often simplifies the solution process.
Additionally, always keep your essential formulae at your fingertips; these are invaluable tools that will guide you in solving the questions accurately.
If you're looking for more strategies on how to tackle questions related to Light effectively, we at Aspire Thinking are here to help. We can provide you with more tips, practice questions, and expert guidance to improve your understanding and performance in this topic.
Feel free to WhatsApp us at 87498157 for more details on how we can support your learning journey.

Static Electricity
Core Concepts
What is Static Electricity?
-
Static Electricity : It refers to the build-up of electric charge on the surface of objects. The "static" in the name refers to the charge's stationary nature, meaning it doesn’t flow like current electricity.
Charging Methods
Objects can be charged in several ways:
-
Friction : When two different materials are rubbed together, electrons may be transferred from one to the other, leading to one object being negatively charged and the other positively charged.
-
Conduction : Touching a charged object to a neutral one can transfer some charge, charging the initially neutral object.
-
Induction : Bringing a charged object close to a neutral one can induce a charge without direct contact:
-
Place the metal sphere on an insulating stand so it does not ground itself.
-
Bring a charged rod near the metal sphere but do not let them touch.
-
While the charged rod is near the metal sphere, touch the sphere with your finger or a grounding wire.
-
Remove your finger or the grounding wire, then move the charged rod away.
-
All 4 steps must be done in said order.
-
Law of Electrostatic
-
Like charges repel, while unlike charges attract.
-
Charged objects can attract neutral objects.
Electric Field and Electric Potential
-
Electric Field : A region in which a charged particle experiences an electrostatic force. The direction of the field is taken to be the direction in which a positive test charge would move if placed within the field.
Uses and Hazards of Static Electricity
Uses:
-
Inkjet Printers : They use static electricity to direct tiny droplets of ink.
-
Photocopiers : They employ static charge to transfer ink to the paper.
-
Static Cling : Beneficial in some industrial applications to make materials stick together.
Hazards:
-
Fuel Sparks : Static electricity can ignite fuel vapors during fueling operations.
-
Electrostatic Discharge (ESD) : Sudden discharges can damage electronic components or cause sparks.
Grounding
-
Grounding : Connecting a charged object directly to the earth to neutralize it. The earth can provide or accept an excess of electrons, ensuring the object is charge-neutral.
Practical Implications
-
Industry : Electrostatic precipitators in factories help remove fine particles from smokestacks by charging them.
-
An electrostatic precipitator (ESP) is a device commonly used in industrial settings to remove particles like dust, ash, and other pollutants from a flowing gas stream, such as the flue gas generated in a coal-burning power plant. Here's how it works:
-
Ionization Chamber: The polluted air is first passed through an ionization chamber where it is exposed to a high-voltage electrode. This electrode imparts a negative charge to the particles in the air.
-
Electrostatic Field: As the charged particles move through the ESP, they pass through a region where there is an electrostatic field generated by a series of oppositely charged plates.
-
Attraction and Collection: These charged particles are attracted to the oppositely charged plates and stick to them.
-
Particle Removal: Periodically, the plates are mechanically tapped or are otherwise treated to remove the accumulated particles, which fall into a collection bin for disposal or recycling.
-
-
Aerospace : Spacecraft are designed with materials to dissipate static electricity since a discharge in space can be fatal.
-
Electronics : ESD wristbands are used by workers when handling sensitive electronic components to prevent damage.
Current of Electricity
Core Concepts
What is Electric Current?
-
Electric Current: It is the rate of flow of electric charge through a conductor, usually measured in amperes (A). It results from the motion of free electrons or charge carriers in a material.
-
Formula - I = Q/t where I represents the current, Q the amount of charge and t the time for which the current flows.
Conventional Current
-
Direction: Flows from the positive terminal to the negative terminal of a voltage source, such as a battery.
-
Historical Context: Proposed before the discovery of electrons, based on the idea that "something" was flowing from a higher potential to a lower potential.
-
Used in: Predominantly used in engineering, physics, and circuit diagrams.
-
Charge Carriers: Assumes that positive charge carriers are moving through the circuit.
-
Representation: Often denoted by the symbol I.
Electron Flow
-
Direction: Electrons flow from the negative terminal to the positive terminal of a voltage source.
-
Scientific Accuracy: Reflects the actual flow of electrons, which are negatively charged.
-
Used in: Primarily used in semiconductor theory and some fields of physics.
-
Charge Carriers: Acknowledges that the movement of electrons is responsible for current.
-
Representation: Sometimes denoted as e-.
Example
You have a circuit where a total of 5 coulombs of charge have passed through. The current was 1 ampere. To find how long the current flowed, rearrange the equation to solve for time:
I = Q/t , t = Q/I = 5 / 1 = 5s.
Electromotive Force (it's not a force)
The Electromotive Force (e.m.f.) of a source is defined as the work done per unit charge by that source in driving charges around a complete circuit.
Essentially, e.m.f. represents the energy supplied by the source to move one coulomb of charge through the entire circuit. It is measured in volts (V).
In a way, you can think of e.m.f. as the "pushing ability" of a source like a battery or a generator to move electric charge through a circuit. It provides the electrical potential that enables current to flow, doing work on the charges to overcome resistances and other energy-consuming elements in the circuit.
The concept of e.m.f. is crucial in understanding how electrical energy is converted from other forms of energy (like chemical energy in a battery) to drive a current around a circuit.
Potential Difference and Resistance
-
The Potential Difference (p.d.) across a component in a circuit is defined as the work done per unit charge in driving charges through that specific component. Like e.m.f., the potential difference is also measured in volts (V).
-
In other words, while the e.m.f. gives you an idea of the total "pushing ability" of a source for the entire circuit, the potential difference across a particular component tells you the amount of work done to move a unit charge through just that component.
-
This concept is important for understanding how electrical energy is used or dissipated within individual components of a circuit, such as resistors, capacitors, or inductors. When a current passes through a resistor, for instance, a potential difference appears across the resistor's terminals, and energy is converted into heat. This is essentially the work done per unit charge as it moves through the resistor, and it's this quantity that is measured as the potential difference in volts.
-
Resistance: It quantifies how a component reduces the flow of current. Resistance is measured in ohms (Ω) and depends on factors like the material's nature, its length, cross-sectional area, and temperature.
-
The relationship R=V/I states that the resistance (R) of a conductor is equal to the potential difference (V) across it divided by the current (I) flowing through it. The unit of resistance is the ohm (Ω). This formula is fundamental for solving a wide range of problems related to electric circuits.
Resistance of a conductor based on its length, resistivity and cross-sectional area
The resistance (R) of a wire is directly proportional to its length (L) and inversely proportional to its cross-sectional area (A). This relationship is commonly expressed as:
R=ρ(L/A)
Here, ρ is the resistivity of the material, a property that describes how strongly a given material opposes the flow of electric current. The units of resistivity are Ω⋅m.
Copper is low resistivity whereas nichrome has high resistivity
Ohm’s Law
Ohm’s Law states that the current passing through a conductor between two points is directly proportional to the potential difference across the two points when the temperature remains constant.
Electromotive Force (e.m.f) and Internal Resistance (optional)
-
Electromotive Force (e.m.f): It's the energy provided by a cell or battery per coulomb of charge passing through it.
-
Internal Resistance: Resistance inside a battery or cell that causes a reduction in the terminal potential difference when delivering current.
I-V characteristic graphs
I-V characteristic graphs plot the relationship between current (I) and voltage (V) for a particular electrical component. These graphs provide valuable insights into the behavior of different components under varying electrical conditions. Let's interpret the I-V characteristics for three types of conductors: a metallic conductor at constant temperature (Ohmic), a filament lamp, and a semiconductor diode.
1. Metallic Conductor at Constant Temperature (Ohmic Conductor)
For a metallic conductor at constant temperature, the I-V graph is a straight line passing through the origin, which indicates a linear relationship between current and voltage. This is the behavior predicted by Ohm's Law V=I×R, where R is a constant resistance value. The slope of the line gives you the reciprocal of the resistance (1/R).
Interpretation: In such an Ohmic conductor, the resistance remains constant across varying levels of current and voltage. This is typically true for materials like copper and aluminum, provided the temperature remains constant.
2. Filament Lamp
The I-V graph for a filament lamp is a curve that starts at the origin but becomes steeper as you move to the right. This curvature indicates that the resistance of the lamp increases with the current.
Interpretation: The filament lamp does not obey Ohm's Law, as the resistance changes with the current (or voltage). The reason for this is that the temperature of the filament increases as more current flows through it, causing an increase in resistance. Therefore, the relationship between current and voltage is nonlinear.
3. Semiconductor Diode
The I-V graph for a semiconductor diode is quite distinct: it shows very little current flow when the voltage is negative (reverse bias) but shows a rapid increase in current when the voltage is positive beyond a certain point (forward bias).
Interpretation: Diodes are designed to allow current flow in only one direction. When the diode is forward-biased (positive voltage), the current increases exponentially after a certain threshold voltage. When it is reverse-biased, practically no current flows, showing its effectiveness as a one-way valve for electric current.
Core Concepts
What are D.C. Circuits?
-
D.C. Circuits: These are electrical circuits in which the current flows in one direction only, typically powered by cells or batteries that provide a constant voltage.
Components of D.C. Circuits
-
Voltage Source: Like a battery or cell, it provides the potential difference needed for current flow.
-
Resistor: A component designed to introduce resistance into the circuit, controlling the current flow.
-
Switch: Allows for breaking or completing the circuit path.
Setting Up Circuits
-
Series Connection: Components connected end-to-end. The total resistance is the sum of individual resistances.
-
Parallel Connection: Components connected at common points, allowing multiple paths for current flow.
Measurements in Electrical Circuits
-
Measuring Current: An ammeter is connected in series to measure the flow of current.
-
Measuring Potential Difference: A voltmeter is connected in parallel across the component of interest.
-
Measuring Resistance: Often done using an ohmmeter or by calculating using Ohm's Law.
Practical Use of Resistors
-
Fixed Resistors: Have a constant resistance. Used to set the current to a desired level in a circuit.
-
Variable Resistors: Allow for adjustment of resistance. Used in applications like volume controls in radios.
Series and Parallel Arrangements
-
Series Circuits: Components are connected end-to-end. The total resistance is the sum of individual resistances, and the current remains constant across all components.
-
In a series circuit, the current at every point is the same. This is because there is only one path for the current to flow, so the same amount of charge passes through every component in a given time interval. This principle is based on the law of conservation of charge, which states that electric charge cannot be created or destroyed.
-
In a series circuit, the sum of the potential differences (voltages) across each component is equal to the total potential difference (or emf) across the entire circuit. Mathematically, this can be expressed as: Vtotal=V1+V2+V3+…
-
This principle is a direct consequence of the law of conservation of energy. The electrical energy provided by the power source is distributed among the components in the circuit, and the sum of the energies across each component must equal the total energy provided.(Kirchoff's 2nd Law)
-
-
Parallel Circuits: Components are connected across common points. The total resistance is given by the reciprocal of the sum of reciprocals of individual resistances. The voltage remains consistent, but the current divides among branches.
-
In a parallel circuit, the sum of the currents in the separate branches is equal to the current from the source. This principle is based on the law of conservation of charge, which states that electric charge cannot be created or destroyed. Mathematically, this can be represented as: Itotal=I1+I2+I3+… (Krichoff's 1st law)
-
Here Itotal is the total current supplied by the source, and I1,I2,I3,…I1,I2,I3,… are the currents in the individual parallel branches.
-
In a parallel circuit, the potential difference (voltage) across each of the separate branches is the same as the potential difference across the source. This is because all components in parallel are directly connected to the source voltage. Mathematically, this can be expressed as:
-
Vtotal=V1=V2=V3=…
-
Here Vtotalis the total potential difference (or emf) supplied by the source, and V1,V2,V3,… are the potential differences across the individual parallel branches.
-
Kirchhoff’s Laws
-
While the syllabus doesn't cover Kirchoff's Laws, we have been using the principles when solving circuits problems. See if you can spot the similarities.
-
Kirchhoff’s First Law (Junction Rule): The sum of currents entering a junction equals the sum of currents leaving the junction.
-
Kirchhoff’s Second Law (Loop Rule): The sum of the potential differences around any closed loop in a circuit equals zero.
Potential Divider Rules
The potential divider rule is a straightforward way to find the voltage across one of the resistors in a series circuit with multiple resistors. According to this rule, the voltage V1 across a specific resistor R1 is proportional to the resistance of R1 and the total voltage Vtotal supplied to the circuit. The formula for the potential divider rule is:
V1=Vtotal×(R1/Rtotal)
Here,
-
V1 is the voltage across the resistor R1
-
Vtotal is the total voltage supplied to the series circuit
-
R1 is the resistance of the specific resistor
-
Rtotal is the total resistance in the series circuit, calculated as R1+R2+…
Potentiometer
A variable potential divider, commonly known as a potentiometer, is a three-terminal resistor with an adjustable sliding contact. The device essentially consists of a resistive element, often in the shape of a circle or a straight line, and a jockey (or crocodile clip) that moves along this element. The jockey (or crocodile clip) can slide linearly across the wire.
Action of a Potentiometer
-
Voltage Division: The primary action of a potentiometer is to divide the input voltage based on the position of the jockey. When you adjust the wiper's position, you change the amount of resistance on either side of it, thus varying the voltage at the jockey terminal with respect to one of the ends.
-
Three Terminals: The two ends of the resistive element connect to the circuit's voltage source, and the jockey connects to the circuit's output. When you move the jockey, you effectively change the ratio of resistances between the jockey and the two ends, altering the voltage at the output.
-
Output Voltage: The voltage at the jockey (output voltage) will be a fraction of the total voltage applied across the potentiometer. This fraction is determined by the ratio of the resistance between one end and the jockey to the total resistance of the device.
-
If Vin is the voltage across the potentiometer, Rtotal is its total resistance, and Rjockey is the resistance between one end and the wiper, then the output voltage Vout can be calculated as: Vout=Vin×(Rjockey/Rtotal)
Negative Temperature Coefficient (NTC) Thermistors
-
Function: An NTC thermistor is a type of resistor whose resistance decreases as temperature increases. The "negative temperature coefficient" implies that the resistance and temperature are inversely related.
-
Use in Potential Dividers: In a potential divider circuit, an NTC thermistor can be paired with a fixed resistor. The output voltage from the divider can then be used as a temperature-dependent signal. When the temperature rises, the resistance of the NTC thermistor falls, and the output voltage across it will also decrease if it is placed in series with a fixed resistor. This voltage can be measured and used to infer temperature changes.
-
Applications: NTC thermistors are often used in temperature sensing applications such as thermostats, temperature-controlled fans, and over-temperature protection circuits.
Light-Dependent Resistors (LDRs)
-
Function: A Light-Dependent Resistor (LDR) is a type of resistor whose resistance decreases when the intensity of light falling on it increases.
-
Use in Potential Dividers: When used in a potential divider circuit, an LDR can be paired with a fixed resistor. The output voltage of the divider will then be dependent on the light levels hitting the LDR. In a dark environment, the LDR’s resistance is high, so the output voltage across it will be closer to the source voltage. In a bright environment, the resistance drops, and the output voltage decreases.
-
Applications: LDRs are commonly used in light-sensitive applications like automatic street lights, camera light meters, and alarms that are triggered by changes in light level.
As Input Transducers in Potential Dividers
- An input transducer is a device that converts one form of energy into another, usually for the purpose of measurement or data collection. Specifically, it converts a physical quantity such as temperature, light intensity, pressure, etc., into an electrical signal like voltage or current. This electrical signal can then be measured, analyzed, and interpreted by electronic circuits or microcontrollers to make decisions, perform actions, or provide feedback.
-
Both NTC thermistors and LDRs can act as input transducers in potential divider circuits, converting changes in physical conditions (temperature for NTC thermistors, light level for LDRs) into changes in voltage. These voltage changes can then be easily measured and processed by electronic circuits or microcontrollers to make decisions, activate other devices, or provide user feedback.
-
For example, in a smart home application, an NTC thermistor could be used in a potential divider circuit to monitor room temperature and control an HVAC system accordingly. Similarly, an LDR in a potential divider could be used to detect if it's daytime or nighttime and automatically turn on or off the outdoor lights.
Practical Implications
-
Consumer Electronics: Devices like radios, flashlights, and handheld game consoles rely on D.C. circuits.
-
Automotive: Car batteries operate on direct current, powering everything from ignition systems to lights and radio.
-
Renewable Energy: Solar panels produce direct current which is often converted to alternating current (A.C.) for various uses.
Author's note
DC Circuits is one of the most challenging topics for Sec 4 O Level Physics. We understand that it can be complex and sometimes confusing. Topics like potential dividers, Ohm's Law, series and parallel circuits, and input transducers like thermistors and LDRs often require thorough understanding and practical application.
If you find yourself puzzled by any of these topics or have specific questions you'd like to clarify, please don't hesitate to reach out to us for assistance. Your understanding is crucial, not only for academic success but also for gaining a practical grasp of these concepts.
You can reach us via WhatsApp at 87498157 for a quicker response. We are here to help you master these essential topics and are always open to providing additional explanations or resources as needed.
D.C. Circuit

Core Concepts
Heating Effect of Electricity
The heating effect of electricity is a phenomenon where electrical energy is converted into thermal energy, or heat. This is commonly exploited in various household and industrial appliances for a range of applications. Below are some examples of how the heating effect of electricity is utilized in common appliances:
Electric Kettles
Mechanism: An electric kettle contains a heating element, usually made of a metal with high resistance, like nichrome. When electrical current flows through the element, its resistance causes the element to heat up, converting the electrical energy into thermal energy.
Use: This thermal energy is then transferred to the water inside the kettle, raising its temperature until it boils.
Ovens
Mechanism: Similar to electric kettles, ovens also contain heating elements made of high-resistance material. In some ovens, there might be multiple elements placed at different positions to provide even heating.
Use: The heating elements turn red hot when electric current flows through them, emitting heat that cooks the food inside the oven. Some ovens even have a fan to distribute the heat more evenly.
Heaters
Mechanism: Electric heaters also operate based on the heating effect of electricity. They contain coils made of high-resistance materials like nichrome, which get hot when electric current flows through them.
Use: The heat generated by these coils is then usually spread throughout the room by convection, often assisted by a fan, or by radiation through materials that absorb and emit thermal radiation effectively.
Power and Energy Formulae
The equations P=VI and E=VIt are fundamental in understanding how electrical power and energy are related to voltage, current, and time.
Here's how each can be applied to new situations or to solve related problems:
Recall:
-
P=VI — Power (P) is equal to Potential Difference (V) multiplied by Current (I)
-
E=VIt — Energy (E) is equal to Potential Difference multiplied by Current (I) and Time (t)
Applications:
Power (P = VI):
-
Calculating Efficiency: You can use this formula to find out how efficiently an electrical appliance like a heater is converting electrical power into heat. If you know the voltage and current, you can find the power, and compare it to the thermal energy emitted to determine efficiency.
-
Safety Assessments: When you know the voltage and current ratings, you can determine if an electrical wire or component can safely handle the load of an electrical device.
-
Cost Calculations: Understanding the power usage of household appliances can help you estimate the cost of running them.
Calculating the Cost of using Electricity
Calculating the cost of using electrical appliances when the energy unit is the kilowatt-hour (kWh) is a straightforward process. The general formula for calculating the electricity cost is:
Cost=Energy Consumed (in kWh)×Cost per kWh
Steps:
1. Determine the Power Rating of the Appliance which is usually given in watts (W). Always convert to kW where necessary.
2. Calculate Energy Consumption: Use the formula E=P×t, where E is energy in kWh, P is power in kW, and t is time in hours (hours not secs). To convert the power from watts to kilowatts, divide by 1000.
3. Find the Cost per kWh (usually from the question)
4. Calculate the Total Cost: Multiply the energy consumed by the cost per kWh.
5. Example: a 900 W appliance used for 120 mins would use - (900/1000)kW x (120/60) hrs = 1.8 kWh of energy. At a rate of 30 cents per kWh, that would incur a cost of 1.8 x 0.3 = $0.54
Live Wire
-
Role: The live wire is responsible for supplying voltage and current to an electrical device or appliance.
-
Potential: This wire is at a high potential and the wire through which the electrical current enters the appliance.
-
Color Coding: the live wire is brown.
Neutral Wire
-
Role: The neutral wire serves as a return path for the electrical current
-
Voltage: Under ideal conditions, the neutral wire is at a low potential
-
The current in the neutral wire should be the same as that of the live wire
-
Color: Blue
Earth Wire
-
Role: The earth wire provides a path for electrical faults to be safely dissipated into the earth, reducing the risk of electric shock or fire.
-
Voltage: Under ideal conditions, the neutral wire is at a low potential
-
Color: Green and Yellow
-
There should be no current in the earth wire when the device is working properly.
Components of the Mains Plug
-
Live Terminal: This is usually the terminal on the right when you look at the plug with the earth pin at the bottom. It connects to the live wire.
-
Neutral Terminal: Generally positioned on the left side (with the earth pin at the top), this terminal connects to the neutral wire.
-
Earth Terminal: This is the top terminal in a three-pin plug, located above the live and neutral terminals. It connects to the earth (or ground) wire.
-
Fuse: Located on the live side, it's designed to break the circuit if too much current flows through it.
-
Cable Grip: This is a mechanical clamp usually located at the point where the cable enters the plug. It grips the outer insulation of the cable to provide strain relief.
-
Casing: The outer plastic casing holds all the internal components. It is usually held together with screws and is made of insulating material for safety.
Safety Measures
-
Proper Wire Stripping: Care should be taken to strip enough insulation off the wires so that they can be securely fastened to their respective terminals, but not so much that bare wire is exposed outside the terminals.
-
Tight Connections: All screws should be tightened securely to ensure good electrical contact and to prevent wires from coming loose.
-
Fuse Rating: The fuse must be of the correct rating for the appliance. Too high a rating might not protect the appliance properly, while too low a rating might cause the fuse to blow unnecessarily.
-
Cable Grip: Ensure the cable grip is tightly fastened around the outer insulation of the cable for strain relief.
Author's Note: Some of the points mentioned above are commonly found in Past year O Level Physics Examinations Papers. Do check your Ten Year Series on it!
Damaged Insulation
Hazards:
-
Electric Shock: Exposed wires can result in a direct electric shock to anyone who comes in contact with them.
-
Short Circuit: Damaged insulation can lead to a short circuit, causing excessive current to flow through the circuit, potentially damaging devices and causing fires.
-
Electrical Fires: A compromised insulation can lead to sparks that may ignite flammable materials nearby.
Overheating of Cables
Hazards:
-
Fire Risk: Overheating can deteriorate the insulation around cables, increasing the risk of an electrical fire.
-
Equipment Damage: Excessive current through cables can damage electrical devices connected to them.
-
Melting of Cables: Extreme overheating can cause cables to melt, further exposing electrical conductors and increasing the hazards, including the risk of short circuit.
Damp Conditions
Hazards:
-
Electric Shock: House tap water(containing dissolved salts) is a conductor of electricity, and its presence near electrical circuits can create paths for electricity to flow through, potentially causing an electric shock.
-
Short Circuit: Moisture can create unintended conductive paths, resulting in a short circuit.
-
Corrosion: Dampness can lead to corrosion of metal components in electrical systems, further reducing their effectiveness and safety.
-
Equipment Failure: Electrical devices can malfunction or get damaged when exposed to moisture.
Setting Up Circuits
-
Series Connection: Components connected end-to-end. The total resistance is the sum of individual resistances.
-
Parallel Connection: Components connected at common points, allowing multiple paths for current flow.
Measurements in Electrical Circuits
-
Measuring Current: An ammeter is connected in series to measure the flow of current.
-
Measuring Potential Difference: A voltmeter is connected in parallel across the component of interest.
-
Measuring Resistance: Often done using an ohmmeter or by calculating using Ohm's Law.
Practical Use of Resistors
-
Fixed Resistors: Have a constant resistance. Used to set the current to a desired level in a circuit.
-
Variable Resistors: Allow for adjustment of resistance. Used in applications like volume controls in radios.
Safety in Electrical Circuits
Fuses and circuit breakers serve as safety mechanisms in electrical circuits, designed to protect against overcurrent conditions that can result in equipment damage or electrical fires. Here's how they work and what fuse ratings mean:
Fuses
How They Work: A fuse is a simple device containing a thin wire made from a material with a low melting point. When the current in a circuit exceeds the safe level, the wire in the fuse melts, breaking the circuit and stopping the flow of electricity.
Fuse Ratings: Fuses are rated by their maximum current capacity, commonly given in amperes (A). This rating represents the maximum current the fuse can handle before the wire melts. You must choose a fuse rating that is slightly higher than the regular operating current of the circuit but lower than the current that would cause harm or damage.
Use: Fuses are commonly used in older buildings and in appliances. They are inexpensive but must be replaced after they "blow" or melt, thereby disconnecting the circuit.
Circuit Breakers
How They Work: Unlike a fuse, a circuit breaker is a reusable device. It works by detecting an overcurrent condition and automatically flipping a switch to break the circuit. Once the problem is resolved, the circuit breaker can be reset manually or automatically to restore the flow of electricity.
Use: Circuit breakers are often used in modern electrical installations in buildings, offering the advantage of easy reset without the need for replacement like fuses.
Commonalities and Differences
-
Both fuses and circuit breakers serve the same fundamental purpose: to protect electrical circuits by interrupting the flow of electricity in case of overcurrent.
-
Fuses are generally more simple, compact, and inexpensive but need to be replaced after use.
-
Circuit breakers are more expensive and larger but can be easily reset and reused.
Importance of Correct Ratings
Choosing the correct rating for fuses and circuit breakers is crucial. An incorrect rating can result either in unnecessary circuit interruptions (if rated too low) or a failure to protect the circuit and connected equipment (if rated too high).
Example: a device operating at 4.5A would require a 5A fuse. 4.5A fuse would prevent the device from working while a 10A would be too high and increases the risk of hazards.
By understanding the role and importance of fuses and circuit breakers, you can better appreciate their contribution to electrical safety in both residential and industrial settings.
Earthing Metal Casings
-
Prevent Electric Shock: Metal casings can become live if a fault occurs inside an appliance, such as a wire coming loose and making contact with the casing. Earthing provides a low-resistance path for the fault current to flow safely into the ground, thus reducing the risk of electric shock to the user.
-
Activate Safety Mechanisms: The sudden increase in current caused by the fault will usually trip a circuit breaker or blow a fuse, disconnecting the electricity supply and making the appliance safe to handle.
Double Insulation
-
Enhanced Safety: Double insulation involves placing an extra layer of insulating material around the live components of an electrical device. This provides an added layer of protection against electric shock, even if the primary insulation fails.
-
No Need for Grounding: Devices with double insulation do not require earthing.
Position of Fuses and Switches
-
When you switch off an appliance, the purpose is to isolate it from the voltage source for safety or energy-saving reasons. Inserting the switch, fuse, or circuit breaker into the live wire ensures that the appliance is completely disconnected from the high voltage(appliance will not remain live), reducing the risk of electric shock or fire.
-
Complete Isolation: Placing these devices in the live wire ensures that no current flows through the appliance when it's turned off. This provides an extra layer of safety, especially during maintenance or repair work.
Enhancing Safety
-
Immediate Overcurrent Protection: Fuses and circuit breakers are designed to protect against overcurrent conditions that could lead to electrical fires or equipment damage. Placing them in the live wire ensures immediate action in the event of a fault, cutting off the current supply to the circuit.
-
Reduced Risk of Electric Shock: If a fuse, switch, or circuit breaker were placed in the neutral wire, the appliance would remain connected to the live voltage even when switched off, posing a risk of electric shock.
Practical Applications of Electricity
-
Household Wiring: Uses both series and parallel connections. Safety mechanisms like fuses and circuit breakers are essential.
-
Electronics: Devices like smartphones, computers, and televisions have intricate circuitry that harnesses principles of practical electricity.
-
Industrial Machinery: Relies on robust electrical systems for operation, often with built-in safety measures.
Practical Electricity
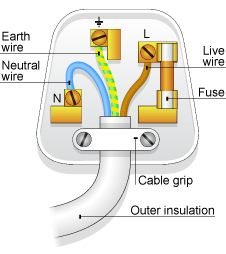
Core Concepts
Basics of Magnetism
-
Magnet: An object or material that produces a magnetic field, attracting or repelling certain materials.
-
Magnetic Poles: The two ends of a magnet, typically termed as North (N) and South (S). Like poles repel each other, while unlike poles attract.
Magnetic Fields
-
Magnetic Field: The region around a magnet where a force is exerted on another magnet or on a magnetic material.
-
Field Lines: Invisible lines that depict the direction and strength of a magnetic field. They emerge from the North pole and curve around to the South pole.
Earth's Magnetism
-
Magnetic North and South: The Earth itself behaves like a giant magnet with its own North and South magnetic poles. Compass needles align with this magnetic field.
Magnetic Material Near a Strong Magnet
-
Magnetic Domains: In ferromagnetic materials like iron, nickel, and cobalt, atoms have magnetic moments that are naturally aligned within regions called magnetic domains. In an unmagnetized state, these domains are randomly oriented, canceling each other out.
-
Alignment of Domains: When you bring a magnetic material close to a strong magnet, the magnetic field exerts a force on the material's magnetic domains. This causes the domains to align themselves in the direction of the magnetic field.
-
Resulting Magnetization: The alignment of these domains results in a net magnetic field in the material, effectively turning it into a magnet. This induced magnet will have a north and south pole and will exhibit magnetic attraction and repulsion like any other magnet.
-
Temporary Magnet: This magnetism is usually temporary; the material will lose its magnetization when removed from the magnetic field, although some residual magnetization may remain depending on the material and the strength of the magnetic field.
-
Magnetic Materials under induced magnetism will always be attracted to the magnet that causes it to be magnetised. There will be no force of repulsion.
Magnetic Material Within a Current-Carrying Solenoid
-
Creating a Magnetic Field: A solenoid (a coil of wire) carrying an electric current generates a magnetic field along its central axis.
-
Uniform Field: The magnetic field inside a solenoid is relatively uniform, making it an ideal environment for inducing magnetism.
-
Alignment of Domains: Similar to the previous case, when a magnetic material is placed inside the solenoid, the magnetic field aligns the magnetic domains within the material.
-
Controlled Magnetization: The advantage of using a solenoid is that you can control the strength and direction of the magnetic field by adjusting the current, allowing you to control the degree of magnetization in the material.
-
This produces an electromagnet with applications like scrap metal lifting, magnetic separation processes, and data storage devices.
Determining the Polarities of a solenoid using the right hand grip rule
-
Trace the direction of current flow in the solenoid. Curl your fingers in the same direction as if you are gripping the solenoid.
-
The thumb represents the north pole. So if it points the left side, it means the north pole is on the left.
Temporary Magnets (e.g., Iron)
Iron is a soft metal that can be used as temporary magnets
Properties:
-
Magnetic Domains: In temporary magnets, the magnetic domains are easy to align but also tend to revert back to their original random orientation when the magnetic field is removed.
-
Magnetization: They become magnetized when exposed to a strong external magnetic field but lose their magnetism relatively quickly once the field is removed.
-
Reversibility: Their magnetic properties are reversible; they can be magnetized and demagnetized multiple times.
Uses:
-
Electromagnets: Ideal for use as the core material in electromagnets where you want to control when the magnet is on or off.
-
Relays and Switches: Used in electrical relays and switches that need to toggle between magnetic and non-magnetic states.
-
Magnetic Separation: In industrial processes to separate ferrous materials from other substances temporarily.
Permanent Magnets (e.g., Steel)
Steel is a hard metal that can be used as permanent magnets
Properties:
-
Magnetic Domains: The magnetic domains in permanent magnets are difficult to reorient. Once aligned, they tend to stay that way.
-
Magnetization: They remain magnetized even in the absence of an external magnetic field.
Uses:
-
Motors and Generators: Used in electric motors and generators where a constant magnetic field is required.
-
Data Storage: In hard disk drives to store data.
-
Magnetic Locks: In security systems where a strong and constant magnetic force is needed.
Electromagnetism
-
Electromagnet: A type of magnet where the magnetic field is produced by an electric current. The field disappears when the current stops.
-
Magnetic Effects of Current: A current-carrying conductor produces a magnetic field around it. The strength and direction of this field vary based on the current's magnitude and direction.
Compasses used to determine the direction of a magnetic field
A compass will point towards the direction of a magnetic field. Therefore, they can be used in plotting and drawing magnetic fields on paper since magnetic fields cannot be seen.
Applications of Electromagnetism
-
Electric Motors: Devices that convert electrical energy into mechanical energy using the principles of electromagnetism.
-
Transformers: Devices that change the voltage of alternating current (AC) using electromagnetic induction.
-
Magnetic Storage: Devices like hard drives store data using magnetized areas.
Quick steps to demagnetise a permanent magnet using the AC supply Method
1. Set up AC supply connecting to to solenoid
2. Turn on AC supply
3. Insert magnet into solenoid
4. Slowly remove magnet from solenoid
Magnet is demagnetised. Other ways: heating and blunt force trauma
Practical Implications
-
Navigation: Traditional compasses rely on Earth's magnetism to indicate direction.
-
Medical Field: MRI machines use strong magnetic fields to visualize internal structures of the body.
-
Transport: Maglev (Magnetic Levitation) trains float above the tracks using strong magnets, reducing friction and allowing high speeds.
Magnetism
Simple Experiment to Plot Magnetic Field Plotting a magnetic field using a bar magnet, such as a compass, is a common educational exercise to visualize magnetic field lines. The basic idea is to use the compass to trace the invisible lines of force that constitute the magnetic field around a magnet. Here's how you can do it: Materials Needed: A sheet of paper A bar magnet A compass A pencil or pen for marking Optional: Graph paper for more precise plotting Procedure: Initial Setup: Place a sheet of paper on a flat surface, and put the bar magnet in the center of the paper. If you're using graph paper, this will help in plotting points more precisely. Outline Magnet: Use the pencil to outline the position of the magnet on the paper so that you know its orientation (which end is north and which is south). Place Compass: Place the compass near one end of the bar magnet, taking care to note which end of the compass needle is the "north-seeking" end (often marked with red). Mark Points: Once the compass needle has stabilized, mark two points on the paper at the ends of the compass needle. These points represent the direction of the magnetic field at that location. Move Compass: Without changing the orientation of the paper or magnet, lift the compass and place its tail end (the end that was pointing toward the south pole of the bar magnet) at the point where the head (the north-seeking end) was just located. Repeat: Allow the compass needle to stabilize again and mark two new points at the ends of the needle. Draw Line: Once you have several pairs of points, use your pencil to connect them, forming a smooth curve. This curve represents a magnetic field line. Multiple Lines: To get a fuller picture of the magnetic field, repeat steps 3-7 starting from different positions around the magnet. Direction Arrows: Finally, add arrows to your curves to indicate the direction of the field. Remember, the field lines go from the north pole of the bar magnet to the south pole. Points to Remember: Keep the compass level for an accurate reading. Make sure there are no other strong magnetic or metallic objects nearby that could interfere with the compass. The closer the field lines are to each other, the stronger the magnetic field in that region. By following these steps, you can plot the magnetic field lines around a bar magnet. This exercise provides valuable insight into the nature of magnetic fields, which is fundamental to many areas of science and engineering.
Core Concepts
Intersection of Electricity and Magnetism
-
Electromagnetism: A branch of physics describing how electric currents and magnetic fields interact. It highlights the magnetic effect of electric currents and the electric effect of changing magnetic fields.
Magnetic Effect of Current
-
An electric current flowing through a conductor produces a magnetic field around it. The direction and strength of this magnetic field depend on the current's magnitude and direction.
-
Right-Hand Grip Rule: A handy tool for determining the direction of the magnetic field around a current-carrying conductor. If you grip the conductor with your right hand with the thumb pointing in the direction of the current, the fingers will curl in the direction of the magnetic field.
-
The right hand grip rule current in a wire is often confused with the right hand grip rule for current in a solenoid. Make sure to revise them often.
Magnetic Field Due to Currents in Solenoids:
In a solenoid (a coil of wire), the magnetic field lines are parallel and uniform inside the coil and resemble the magnetic field of a bar magnet outside the coil. Again, the right-hand rule can be used: curl your fingers in the direction of the current, and your thumb will point in the direction of the magnetic field inside the solenoid.
Effects of Changing Magnitude and/or Direction of Current:
-
Magnitude of Current: Increasing the current will strengthen the magnetic field, while decreasing it will weaken the magnetic field. The field is directly proportional to the current.
-
Direction of Current: Reversing the direction of the current will reverse the direction of the magnetic field.
-
Coil Turns in Solenoids: Increasing the number of turns per unit length in a solenoid will also increase the magnetic field strength.
Electromagnets
-
Electromagnet: A type of temporary magnet created by running an electric current through a coil of wire. The strength of the electromagnet can be varied by changing the number of coils or the amount of current flowing through the wire.
Circuit Breakers
In a circuit breaker, an electromagnet is used to detect overcurrent conditions. When the current flowing through the circuit exceeds a predetermined safe level, the magnetic field generated by the electromagnet becomes strong enough to actuate a lever connected to a switch. This action opens the circuit, interrupting the flow of electricity and thus protecting the wiring and devices from damage due to overheating or electrical fires.
Force on a Current-Carrying Conductor
-
Motor Effect: When a current-carrying conductor is placed in a magnetic field, it experiences a force. This effect is harnessed in electric motors to produce rotational movement.
Fleming's Left-Hand Rule
It's used to determine the relative directions of force, magnetic field, and current when any two of these are at right angles to each other in a motor effect.
To use Fleming's Left-Hand Rule, follow these steps:
-
Stretch Out Your Left Hand: Open your left hand fully and stretch out your thumb, forefinger, and middle finger so they are all perpendicular to each other.
-
Thumb: Represents the direction of the Force or Motion (F) acting on the conductor.
-
First Finger: Represents the direction of the magnetic Field (B).
-
Middle Finger: Represents the direction of the electric Current (I).
-
Position Your Hand: Align your hand such that the first finger points in the direction of the magnetic field and the middle finger points in the direction of the electric current. Your thumb will then indicate the direction of the force or motion on the conductor.
Tip: once you have aligned your finger to one of the directions, it's important not to change the direction of that finger. You can rotate the wrist but you can't point it at another direction.
Examples:
-
If you know the directions of the magnetic field and the current: Position your forefinger to point in the direction of the magnetic field and your middle finger to point in the direction of the current. Your thumb will then show the direction in which the force is exerted on the conductor.
-
If you know the directions of the force and the magnetic field: Position your thumb to indicate the direction of the force and your forefinger to indicate the direction of the magnetic field. Your middle finger will then show the direction of the current.
-
If you know the directions of the force and the current: Position your thumb to indicate the direction of the force and your middle finger to indicate the direction of the current. Your forefinger will then point in the direction of the magnetic field.
The Turning Effect
When a current flows through the coil, magnetic forces act on the sides of the coil that are within the magnetic field. These forces are directed opposite to each other, causing the coil to rotate about the axis of the coil. To find the direction of the forces, apply Fleming's Left Hand Rule on the each side of the coil.
This rotation is harnessed to perform mechanical work, such as turning a fan blade or a wheel.
Factors that Increase the Turning Effect:
-
Increasing the Number of Turns on the Coil (i)
-
More Interactions: More turns mean more wire in the magnetic field, which leads to a greater interaction between the magnetic fields.
-
Increased Torque: The overall torque (turning effect) is magnified.
-
-
Increasing the Current (ii)
-
Stronger Magnetic Field: A higher current generates a stronger magnetic field around the coil.
-
Greater Force: According to Fleming's Left-Hand Rule, a stronger magnetic field due to a higher current will result in a stronger force acting on the coil.
-
Increased Torque: A stronger force translates to a greater turning effect or torque on the coil.
-
Split-Ring Commutator:
A split-ring commutator is an essential component in a two-pole, single-coil motor. It serves as a rotary switch that reverses the direction of the current flowing through the coil at the appropriate moments, thereby ensuring continuous rotation of the coil.
How It Works:
-
Contact Points: The split-ring commutator consists of two semi-circular metal rings attached to the coil's axis of rotation. Carbon brushes maintain contact with these rings as the coil rotates.
-
Current Reversal: As the coil rotates 90 degrees from horizontal position, the commutator also turns. This change swaps the connections between the coil and the external circuit, effectively reversing the current direction in the coil.
-
Continuous Rotation: Reversing the current direction at the right moments ensures that the force on the coil continues to turn it in the same rotational direction, rather than simply oscillating back and forth.
Using a soft iron core
Effect of Winding the Coil onto a Soft-Iron Cylinder:
-
Magnetic Amplification: A soft-iron cylinder acts as a core for the coil and enhances the magnetic field generated when a current flows through the coil.
-
Increased Efficiency: The soft-iron core improves the coupling between the coil's magnetic field and the external magnetic field, making the motor more efficient.
-
Greater Torque: The intensified magnetic field results in a stronger interaction with the external magnetic field, which increases the turning effect or torque on the coil.
-
Faster Response: Soft-iron is a ferromagnetic material that is easily magnetized and demagnetized, aiding in quicker response times during the start and stop cycles of the motor.
Practical Implications
-
Consumer Electronics: Devices such as speakers, hard drives, and induction cooktops employ principles of electromagnetism.
-
Transportation: Electric motors in vehicles like trams, trains, and some cars use the motor effect to generate motion.
Here is a video for better understanding:
Electro-magnetism

Author's Note
Electromagnetism is a topic in the O-Level Physics syllabus that often proves to be a formidable challenge for many students. With concepts that delve into the invisible forces that govern the world around us—such as electric fields, magnetic fields, and their interaction—it demands a deep understanding and strong analytical skills to master.
The mathematical components, combined with abstract theoretical frameworks, can make electromagnetism appear quite daunting. Moreover, the subject requires an aptitude for visualization, as many of the phenomena discussed are not directly observable in our daily lives.
It's a topic where theory meets practical application, and both are equally important for a full understanding of the subject matter.
If you or your child is struggling with this topic, don't hesitate to reach out for extra help. We are committed to helping students grasp these challenging concepts and excel in their O-Level Physics examination.
You are strongly encouraged to whatsapp us at 8749 8157. Our team of experienced educators are available to offer tailored assistance to help demystify the complexities of electromagnetism and pave the way for academic success.
Don't let the challenges of this topic discourage you; instead, use them as an opportunity to deepen your understanding of the fascinating world of physics.
Core Concepts
Principles of Electromagnetic Induction
-
Electromagnetic Induction: The phenomenon in which a changing magnetic field within a closed loop induces an electromotive force (e.m.f), and if the circuit is complete, a current will flow.
Faraday's Experiments
-
Faraday's Observations: Michael Faraday discovered that moving a magnet in and out of a coil or loop of wire induces an e.m.f, leading to the flow of current if the circuit is complete.
-
Factors Influencing Induced e.m.f: The magnitude of the induced e.m.f or current depends on the rate of change of the magnetic field, the number of turns in the coil, and the orientation of the coil relative to the magnetic field.
Lenz's Law (optional)
-
Lenz's Law: It states that the direction of the induced e.m.f (and thus the induced current) is such that it opposes the change producing it. This law is a manifestation of the conservation of energy.
Applications of Electromagnetic Induction
-
Generators: Devices designed to convert mechanical energy into electrical energy. When a coil rotates within a magnetic field, an e.m.f is induced, resulting in the generation of electricity.
-
Transformers: These utilize the principle of electromagnetic induction to change alternating voltages. They consist of two coils, the primary and the secondary, wrapped around a magnetic core. The induced voltage depends on the number of turns in each coil.
-
Induction Cooktops: These stovetops heat pots and pans via electromagnetic induction. An alternating current flows through coils, producing a fluctuating magnetic field which induces currents in the cookware, heating it.
How to Use Fleming's Right-Hand Rule
-
Thumb: Point your thumb in the direction in which the conductor is moving relative to the magnetic field.
-
First Finger: Point your first finger (index finger) in the direction of the magnetic field, from the North pole to the South pole.
-
Second Finger: Your second finger (middle finger) will then point in the direction of the induced current (or e.m.f).
All three directions are mutually perpendicular to each other.
Application
Fleming's Right-Hand Rule is commonly used in applications involving generators and motors to predict the direction of the induced current or voltage. It helps in the design and understanding of devices that convert mechanical energy into electrical energy, such as dynamos and alternators.
Simple A.C. Generator:
A simple alternating current (a.c.) generator converts mechanical energy into electrical energy using electromagnetic induction. It typically consists of a coil of wire rotating in a magnetic field or a magnet rotating near a stationary coil.
Rotating Coil Method:
-
Magnetic Field: Two permanent magnets provide a constant magnetic field.
-
Coil: A coil of wire is placed between the magnets and is attached to an axis, allowing it to rotate.
-
Slip Rings: These are circular metal rings attached to the rotating axis and in electrical contact with the coil. As the coil rotates, the slip rings rotate with it.
-
Brushes: Carbon brushes maintain contact with the slip rings, providing an electrical path for the generated current to flow to the external circuit.
Rotating Magnet Method:
-
Magnet: A rotating magnet provides a changing magnetic field.
-
Coil: A stationary coil is placed near the rotating magnet.
-
No Slip Rings Needed: Since the coil is stationary, there's no need for slip rings in this setup.
How It Works:
-
In the rotating coil method, as the coil rotates in the magnetic field, the magnetic flux through the coil changes.
-
In the rotating magnet method, the changing magnetic field from the rotating magnet induces a current in the stationary coil.
-
According to Faraday’s Law, this change in magnetic flux induces an e.m.f. (and hence current) in the coil.
-
According to Lenz's Law, the direction of the induced e.m.f. and current will change as the coil moves through the magnetic field, producing alternating current (a.c.).
Use of Slip Rings:
In the rotating coil method, slip rings serve the following functions:
1. Current Transfer: They allow the generated a.c. to be transferred from the rotating coil to the external circuit.
2. Continuous Connection: Unlike a split-ring commutator, slip rings provide a continuous electrical connection between the rotating coil and the stationary brushes, allowing for the generation of alternating current.
Voltage Output Graph of a simple AC Generator
To sketch a graph of voltage output against time for a simple a.c. generator, you can plot a sine curve that oscillates between a positive peak voltage and a negative peak voltage. The voltage will be zero when the coil is parallel to the magnetic field and will reach its peak value when the coil is perpendicular to the field.
The graph starts at zero, goes up to the peak voltage, returns to zero, drops to the negative peak voltage, and then returns to zero, completing one cycle.
This oscillation repeats over time, producing an alternating current (a.c.).
The periodic nature of this curve indicates that the voltage is alternating, and the shape of the curve (sine or cosine) shows that the change in voltage is sinusoidal over time.
Structure of a Simple Iron-Cored Transformer
A simple iron-cored transformer consists of three main components:
-
Primary Coil: This is the coil through which the alternating current (a.c.) input is fed.
-
Secondary Coil: This is the coil from which the transformed a.c. voltage is taken out.
-
Iron Core: Both coils are wound around a soft iron core, which enhances the magnetic coupling between the coils and provides a pathway for the magnetic flux.
Principle of Operation
The operation of a transformer is based on the principle of electromagnetic induction, specifically Faraday's Law and mutual induction.
Here's how it works:
-
Alternating Current in Primary Coil: When an alternating voltage is applied to the primary coil, it produces an alternating current and thus an alternating magnetic field.
-
Magnetic Flux in Iron Core: This alternating magnetic field generates a changing magnetic flux in the iron core.
-
Induced Voltage in Secondary Coil: According to Faraday’s Law of electromagnetic induction, the changing magnetic flux induces an electromotive force (e.m.f.) in the secondary coil.
-
Transformation Ratio: The voltage transformation is determined by the ratio of the number of turns in the secondary coil (Ns) to the number of turns in the primary coil (Np):
Vs/Vp=Ns/Np=Ip/Is
Where Vs is the voltage in the secondary coil, Vp is the voltage in the primary coil, Ip is the current in primary coil and Is is the current in the secondary coil.
-
Efficiency: The soft iron core helps in efficiently coupling the two coils magnetically, but it can also introduce losses like hysteresis and eddy current losses. High-quality transformers are designed to minimize these losses.
-
For Ideal Transfomers, the power in primary coil is 100% transferred to secondary coil. So we can use the formula IpVp = IsVs (Power = current x voltage)
Types of Transformers:
-
Step-Up Transformer: Increases the voltage from primary to secondary (Ns>Np).
-
Step-Down Transformer: Decreases the voltage from primary to secondary (Ns<Np).
Eddy Currents
-
Eddy Currents: These are circular currents induced in a conductor (like a metal plate) when exposed to a changing magnetic field. They can lead to energy losses due to heating effects but can also be harnessed in applications like induction heating.
Energy Loss in Cables
In electrical transmission lines, energy is lost primarily through resistive heating. When current flows through a conductor, the inherent resistance of the material converts some of the electrical energy into heat, which is then dissipated into the surrounding environment. The power lost (Ploss) due to resistive heating in a cable can be calculated using the formula:
Ploss=I^2×R
Where I is the current and R is the resistance of the wire. The equation shows that the power loss is directly proportional to the square of the current.
Advantages of High Voltage Transmission
To minimize these losses, it's beneficial to transmit electrical energy at high voltages for several reasons:
-
Reduced Current: According to the power formula P=IV, for a given amount of power, increasing the voltage (V) allows us to decrease the current (I). As the power loss is proportional to I^2, reducing the current significantly lowers energy loss.
-
Efficiency: High-voltage transmission is more efficient because less energy is lost as heat. This makes long-distance transmission more practical and economically viable.
-
Reduced Material Cost: Lower current also means that thinner cables can be used, which reduces the material cost of the transmission lines.
-
Lower Thermal Impact: Reduced resistive heating also means that the thermal impact on the environment and the materials of the transmission lines themselves is reduced.
-
Boosted by Transformers: It's relatively easy to step up the voltage for transmission and step it down for distribution using transformers, which can do so with high efficiency.
-
Safety: While high voltages do present some safety risks, these can be managed with proper insulation and physical barriers, making the system overall safe and efficient.
Practical Implications
-
Energy Sector: Power plants, be it hydroelectric, wind, or even coal-fired ones, employ generators that work on electromagnetic induction principles to produce electricity.
-
Transport: Maglev (Magnetic Levitation) trains employ electromagnetic induction principles, allowing them to levitate above the tracks, leading to reduced friction and higher speeds.
-
Home Appliances: Beyond induction cooktops, devices like wireless chargers and certain types of electric toothbrushes utilize principles of electromagnetic induction.
Electro
-magnetic Induction
Author's Note
Electromagnetic Induction is often cited as one of the most challenging topics within the O-Level Physics syllabus.
This complexity arises not only from the intricate theories and calculations it involves but also due to its close relationship with the subject of Electromagnetism. Students frequently find it difficult to distinguish between the two, and this can lead to confusion when trying to apply the correct principles and formulas.
Electromagnetic Induction deals with the generation of an electric current through the changing magnetic field, whereas Electromagnetism focuses on the interaction between electric and magnetic fields. Though they share foundational principles, the applications and specifics can differ significantly. This makes it critical to have a nuanced understanding of both topics to avoid misconceptions and errors.
If you or your child is grappling with these challenging subjects, it is highly recommended to seek additional support. The overlap between Electromagnetism and Electromagnetic Induction can make self-study confusing, and sometimes counterproductive.
You are strongly encouraged to contact us at 87498157 for specialized guidance.
Our experienced educators are well-equipped to clarify these complexities, providing individualized lessons to strengthen your understanding and confidence in tackling these subjects.
Remember, the challenges associated with these topics are not insurmountable. With the right guidance, you can master the intricacies of Electromagnetic Induction and Electromagnetism, setting yourself on a path to excel in your O-Level Physics examination.
Core Concepts
Understanding Radioactivity
-
Radioactivity: A spontaneous process where unstable atomic nuclei emit particles or electromagnetic radiation to attain a stable state.
Nucleus
The nucleus is located at the center of the atom and is positively charged. It contains two types of subatomic particles:
-
Protons: These are positively charged particles and are one of the primary components that define the identity of an element. The number of protons in an atom is called the atomic number, and it determines the element to which the atom belongs.
-
Neutrons: These particles are neutral, meaning they have no electric charge. Neutrons contribute to the mass of the atom but do not affect its electrical charge.
The nucleus is extremely small compared to the overall size of the atom but contains most of the atom's mass. Both protons and neutrons are made up of even smaller particles called quarks, but for most chemical and physical considerations, the proton and neutron can be considered fundamental particles.
Electron Cloud
Surrounding the nucleus is a cloud of electrons, which are subatomic particles carrying a negative electric charge. Electrons are much lighter than protons and neutrons, and they occupy various energy levels or "shells" around the nucleus. The distribution and behavior of these electrons determine the atom's chemical properties, including how it forms bonds with other atoms.
Electrons are attracted to the positively charged nucleus but their specific energy levels are quantized, meaning they can only occupy certain discrete distances from the nucleus. These energy levels are often described using quantum mechanics which is not in the syllabus
Proton (Atomic) Number (Z)
The proton number, also known as the atomic number (Z), is the number of protons in the nucleus of an atom. This number is fundamental in determining the identity of an element. For example, hydrogen has a proton number of 1, helium has a proton number of 2, and so on. The atomic number is denoted by the symbol Z.
Nucleon (Mass) Number (A)
The nucleon number, also known as the mass number (A), is the total number of protons and neutrons in an atom's nucleus. While protons define the element, the combination of protons and neutrons gives you the specific isotope of that element. The mass number is often denoted by the symbol A.
A=Z+N Where A is the mass number, Z is the atomic (proton) number, and N is the number of neutrons.
Isotope
Isotopes are atoms of the same element that have the same number of protons (Z) but a different number of neutrons (N), resulting in a different mass number (A). For example, 12-C and 13-C are both isotopes of carbon. They both have 6 protons (atomic number Z=6) but differ in their number of neutrons and hence have different mass numbers (A=12 and A=13, respectively).
Nuclear Decay
Nuclear decay is both a random and spontaneous process that occurs when an unstable nucleus transitions to a more stable state by emitting radiation. Here's a deeper look into these concepts:
Randomness
The randomness in nuclear decay means that it is impossible to predict exactly when a specific nucleus will decay. While we can't predict the behavior of a single nucleus, we can describe the behavior of a large number of identical nuclei using statistical methods. This is where the concept of "half-life" comes in, which is the time required for half of the nuclei in a sample to decay. It provides a statistical measure of the probability of decay for a given type of nucleus.
Spontaneity
The spontaneity of nuclear decay means that the process happens by itself without needing any external trigger. The nucleus is in an "unstable" state and seeks to move to a more stable state by emitting radiation. This is a probabilistic event based on the internal properties of the nucleus, like the balance between the strong nuclear force and electrostatic repulsion among protons.
Energy Loss and Radiation
When a nucleus decays, it often emits radiation to lose energy and move to a more stable state. This radiation can be in various forms, including:
-
Alpha radiation: Emission of an alpha particle, which is essentially a helium nucleus (24He).
-
Beta radiation: Emission of a beta particle, which is a high-speed electron (β−) or positron (β+).
-
Gamma radiation: Emission of a gamma photon, a form of high-energy electromagnetic radiation.
By emitting these particles or photons, the nucleus transitions to a more stable configuration, reducing its overall energy.
Types of Radioactive Emissions
-
Alpha (α) Particles: Helium nuclei consisting of 2 protons and 2 neutrons. They have a positive charge and are relatively heavy.
-
Beta (β) Particles: High-energy, high-speed electrons or positrons emitted by certain types of radioactive nuclei. They can be negatively or positively charged.
-
Gamma (γ) Rays: Electromagnetic radiation of very high frequency and energy. They are neutral and highly penetrative.
Properties and Penetration Abilities
-
Alpha Particles: Because of their larger mass and positive charge, α-particles have limited penetration abilities, often stopped by a sheet of paper or human skin.
-
Beta Particles: More penetrative than alpha particles but can be stopped by materials like plastic, glass, or a few millimeters of aluminum.
-
Gamma Rays: Highly penetrative and require dense materials, such as lead or several centimeters of concrete, to shield against them.
Background Radiation
Background radiation refers to the natural and artificial sources of ionizing radiation that are present in our environment. It's called "background" radiation because it forms a baseline level of radiation exposure that is virtually inescapable, regardless of your location on Earth. Here's a more detailed understanding:
Sources of Background Radiation
-
Cosmic Radiation: This comes from the Sun and other celestial bodies. While the Earth's atmosphere blocks a large portion of cosmic rays, some still make it to the surface, especially at higher altitudes and latitudes.
-
Terrestrial Radiation: Radioactive elements like uranium, thorium, and radon are naturally present in the Earth's crust. Radon gas, in particular, can accumulate in buildings and is a significant source of background radiation.
-
Internal Radiation: Our own bodies contain naturally occurring radioactive isotopes, such as potassium-40 and carbon-14, which contribute to background radiation.
-
Man-made Sources: This includes medical X-rays, nuclear power plants, and other industrial uses of radiation. Though generally controlled and limited, they do contribute to the overall background radiation.
-
Food and Water: Certain foods like bananas contain small amounts of radioactive isotopes. The water supply can also be a minor source of radiation, particularly if it has flowed through rocks containing uranium or thorium.
Half-life
-
Half-life: The time taken for half the radioactive nuclei in a sample to decay. It's a measure of the stability of a radioactive material.
Applications of Radioactivity
-
Medical Imaging and Treatments: Radioactive materials are employed in imaging procedures like PET scans and treatments like radiotherapy for cancer.
-
Archaeology: Carbon dating, which uses the radioactive decay of carbon isotopes, helps determine the age of ancient artifacts and fossils.
-
Nuclear Energy: Nuclear reactors harness the energy released from the controlled fission of radioactive elements like uranium.
Dangers and Precautions
-
Dangers: Prolonged exposure to radioactive materials can damage living tissues, increasing the risk of cancer and other health issues.
-
Precautions: Proper shielding, using remote handling tools, maintaining distance, and minimizing exposure time are critical when working with radioactive substances.
Practical Implications
-
Industry: Radioactive isotopes are used for tracing in industries, helping detect leaks and monitor the flow of materials.
-
Agriculture: Radioactive tracers aid in studying soil erosion, fertilizer uptake, and pest control methods.
-
Safety Protocols: In nuclear power plants, strict safety guidelines and measures ensure minimal exposure to radiation and prevent nuclear meltdowns.
Nuclear Fusion
Fusion is the process in which two light atomic nuclei combine to form a heavier nucleus. During this process, a small amount of mass is converted into energy.
Energy Release: The energy released in fusion is generally much greater than in fission. The process is responsible for the energy produced in stars, including our sun.
Nuclear Fission
Meaning: Fission is the opposite of fusion. In this process, a heavy atomic nucleus splits into two or more lighter nuclei, along with the release of a large amount of energy.
Energy Release: The energy produced in fission is substantial and is the basis for nuclear power plants. Here, controlled fission reactions in a reactor produce heat, which is then converted to electrical energy.
Relation with Nuclear Fuels
Fusion: The fuel for fusion is usually isotopes of hydrogen, like deuterium and tritium. These are abundant and result in fewer radioactive byproducts compared to fission. However, achieving the conditions for controlled fusion on Earth is a significant scientific and engineering challenge.
Fission: Typical fuels for fission are heavy isotopes like uranium-235 and plutonium-239. These materials are less abundant than hydrogen and produce radioactive waste, but controlled fission is technologically feasible and is used in nuclear power plants.
In both processes, a small amount of mass is converted into energy, aligning with the principle of energy-mass equivalence.
Author's Note
The introduction of the topic of radioactivity to the 2024 O Level Physics syllabus can be daunting, especially when there are no past year papers for you to practice and gauge your understanding.
To address this new addition, we have carefully crafted relevant questions based on the new syllabus to ensure that you are well-prepared for what lies ahead. These questions have been integrated into our lessons, offering you a comprehensive understanding of the topic. We aim to not only teach you the basics but also to challenge you with questions that stimulate critical thinking.
For more information about how we're handling this new topic and to find out about our lesson plans, please feel free to WhatsApp us at 87498157.
Radioactivity


